Cart
0

Table of Contents
- Assess the Injury: Wound Types and Severity
- Stop the Bleeding and Stabilize the Bird
- How to Clean a Chicken Wound
- Chicken First Aid Kit Essentials for Backyard Flocks
- Signs of Infection in Chickens and When to Call a Vet
- Isolation, Sick Bay Setup, and Flock Reintegration
- Preventing Cannibalism and Managing Flock Stress
- Conclusion
- Frequently Asked Questions
Last Updated: September 21, 2026
Assess the Injury: Wound Types and Severity
Treating backyard chicken injuries starts with a calm, close look at the wound. Chickens hide pain, so the injury is often worse than it appears.

A Severity Triage Framework
Before touching the wound, sort the situation into one of three tiers: treat at home, monitor closely, or call a vet now.
| Tier | What You See | Action |
|---|---|---|
| Green, home care | Superficial scrape, small cut under 1 inch, bleeding stopped, bird alert and eating | Clean, dress, isolate, monitor for 48 hours |
| Yellow, home care with vet backup | Deep puncture, laceration over 1 inch, slow bleeding, bird quiet but responsive | Stabilize, clean, isolate, call a vet within 24 hours if any red flags appear |
| Red, emergency | Exposed muscle or bone, degloving, bleeding that will not stop, bird cannot stand or breathe normally, tissue is black or foul-smelling | Stabilize and transport to a vet immediately |
Puncture vs. Laceration vs. Degloving: Type-Specific Protocols
Most guides lump these together. They should not be treated the same way.
-
Do not probe with a needle or forceps to see how deep it goes, you will push bacteria further in and damage tissue.
-
Flush gently with saline from an irrigation syringe.
-
Leave the surface open to drain rather than sealing it under ointment and wrap.
-
Watch for swelling over 24-48 hours. A puncture that swells and feels hot needs a vet; it may need to be opened and drained.
-
Flush thoroughly, then assess whether the edges can be brought together.
-
Small lacerations under 1 inch can be dressed with antibiotic ointment and a non-stick pad.
-
Lacerations over 1 inch, or gaping ones, usually need sutures or surgical glue. Call a vet; healing by second intention takes weeks and scars badly.
-
Check for debris; wire cuts often leave metal fragments or dirt packed into the tissue.
-
These need a vet. The tissue underneath is exposed, contamination is heavy, and the skin flap often dies back over 24-48 hours.
-
Do not stitch a degloving injury at home, you will trap bacteria and the flap will likely necrose anyway.
-
Stabilize with a moist sterile dressing and get to a vet. The sooner the wound is debrided and the flap assessed, the better the outcome.
Watch Out
Never probe a puncture wound with a needle or forceps to "see how deep it goes." You can push bacteria further in and cause more tissue damage. Clean what you can see and let a vet assess the rest.
When the Bird's Behavior Matters More Than the Wound
A small wound on a bird that is standing, eating, and alert is usually a home-care case. The same wound on a puffed-up, droopy-winged, off-feed bird is a bigger problem than it looks, chickens mask pain until they cannot.
- Comb and wattles pale or bluish
- Breathing labored or open-mouthed
- Droppings abnormal (watery, green, or bloody)
- Bird feels cold to the touch
- No interest in food or water for more than a few hours
Stop the Bleeding and Stabilize the Bird
Active bleeding needs direct pressure, not panic. Press a sterile gauze pad firmly on the wound for two to three minutes without lifting to check.
How to Clean a Chicken Wound
Cleaning is where most people go wrong. Rushing this step is the fastest route to infection.
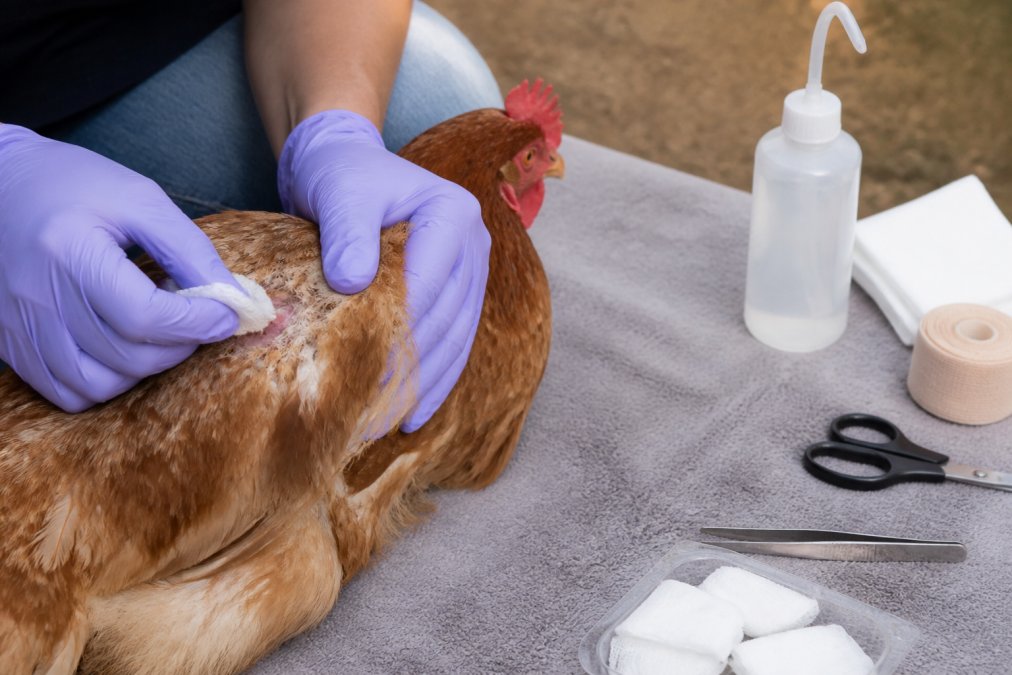
Work in this order:
- Flush the wound with saline solution
- Wipe from the center outward with an antiseptic wipe
- Pat dry with a sterile gauze pad
- Apply a thin layer of antibiotic ointment
- Cover with a non-stick dressing and vet wrap
Natural vs. Chemical Antiseptics
Natural options like honey have mild antibacterial properties but are no substitute for proper wound care. Chemical antiseptics such as povidone-iodine and chlorhexidine kill bacteria reliably and are the standard choice for open wounds.
Deluxe Backyard Chicken First Aid Kit →
Chicken First Aid Kit Essentials for Backyard Flocks
A good chicken first aid kit essentials list covers bleeding, cleaning, wrapping, and infection control. Build it before you need it, because a wounded bird cannot wait for a two-day shipping window.

Here is what belongs in your kit:
- Sterile gauze pads in 2x2 and 4x4 inch sizes
- Gauze rolls and self-adhesive vet wrap
- Saline solution and an irrigation syringe
- Povidone-iodine wipes and antiseptic wipes
- Triple-antibiotic ointment packets
- Styptic powder for bleeding
- Nitrile gloves, forceps, and trauma shears
- Probiotic and electrolyte supplement
Pro Tip
Store your kit in a waterproof box near the coop, not in the house. When a hen is bleeding at dusk, you want supplies within arm's reach, not a trip through the kitchen.
Signs of Infection in Chickens and When to Call a Vet
Signs of infection in chickens show up within 24 to 48 hours: swelling, warmth, pus, a bad smell, or dark necrotic tissue around the wound. A bird that stops eating or stands puffed up with drooped wings is in trouble.
Call a vet if you see any of these:
- The wound is deep or gaping
- Bleeding will not stop after five minutes of pressure
- The bird cannot stand or breathe normally
- Tissue turns black or smells foul
- She refuses food and water for more than a day
Isolation, Sick Bay Setup, and Flock Reintegration
Isolation protects the injured bird from pecking and the flock from infection. How you set up sick bay and bring her back determines whether the wound heals cleanly or reopens the first night she returns.
Sick Bay Setup That Actually Works
A dog crate or rabbit hutch lined with pine shavings is standard. Aim for these conditions:
- Temperature: 85-90°F for a shocky or chilled bird, dropping about 5°F per day toward ambient once she is eating and alert. A securely clamped brooder plate or heat lamp works; check behavior, not just the thermometer, panting means too hot, huddling too cold.
- Space: At least 2 square feet per bird. Two birds in one small crate will peck at each other's wounds.
- Lighting: Dim, indirect light. Bright overhead light raises stress and draws attention to red tissue.
- Ventilation: Draft-free but not sealed. Ammonia buildup irritates respiratory tissue and slows healing.
- Water and feed: Shallow dishes away from bedding so they stay clean. Offer electrolytes for the first 24 hours, then plain water.
- Location: A garage, mudroom, or covered run, close enough to check her several times a day, away from the flock's noise and traffic.
How Long to Isolate
Keep her separated until the wound has closed and stopped draining, typically 5-14 days. A wound that still weeps or smells will attract pecking the moment she returns. If she is on antibiotics, finish the full course first.
Reintegration: The Step Most Guides Skip
Work through these phases:
| Phase | Duration | What to Do |
|---|---|---|
| See-but-not-touch | 3-5 days | Wire divider inside the coop or run. Birds see, hear, and smell each other but cannot make contact. |
| Supervised visits | 2-3 days | Short group time in a large space with multiple feeders and escape routes. Watch for chasing, cornering, and pecking at the wound site. |
| Night return | 1 night | Move her into the coop after dark, when birds are calm and roosting. |
| Dawn monitoring | 2-3 days | Be present at first light. That is when hierarchy disputes flare. |
A few things tip the odds in her favor:
- Mask the wound site. Pick-No-More lotion or a similar cover-up hides the red color that triggers pecking.
- Add clutter. Extra perches, hanging greens, and multiple feed and water stations break sightlines and give a low-ranking bird an escape.
- Return more than one bird if possible. Reintroducing a bonded pair reduces focus on a single newcomer.
- Watch the rooster. His reaction often sets the tone for the hens; if he chases her relentlessly, extend the see-but-not-touch phase.
Key Takeaway
Reintegration is not a single event, it is a 5-10 day process. Plan for it before the wound closes so you are not improvising on the night she is ready to go back.
If bullying continues past a week of phased reintroduction, the bird may need a permanent separate pen or a new flock, chronic stress from being lowest in the order keeps her from thriving even after the wound heals.
Preventing Cannibalism and Managing Flock Stress
Cannibalism prevention starts with space and stimulation. Chickens peck at wounds because blood and red tissue attract them. A single open wound can trigger a flock-wide pecking spree within hours.
Reduce the risk with a few changes:
- Give at least 8 to 10 square feet per bird in the coop and run
- Add perches, dust baths, and hanging greens to fight boredom
- Keep feeders and waterers spread out so birds do not crowd
- Use Pick-No-More cover-up lotion on healing wounds to hide the red color
- Separate any bird that keeps pecking others
Conclusion
A wounded hen tests your nerve as much as your supplies. The difference between a quick recovery and a lost bird often comes down to how fast you act and how well your kit is stocked.
Frequently Asked Questions
What are some home remedies for injured chickens?
For minor wounds, flush with saline solution, apply an antiseptic spray or triple-antibiotic ointment, and cover with a non-stick gauze pad secured by vet wrap. Keep the bird isolated in a warm, quiet sick bay with electrolyte supplement in her water. Avoid human products not labeled for poultry. A dedicated chicken first aid kit with gauze pads, antiseptic wipes, and wound spray keeps treatment fast and consistent.
Will a chicken wound heal on its own?
Small superficial scratches sometimes heal without intervention, but most wounds need cleaning to prevent infection. Chickens have strong tissue repair abilities, yet exposed subcutaneous tissue can quickly become necrotic. Clean the wound, apply antibiotic ointment, and monitor daily for signs of infection in chickens such as swelling, discharge, or foul odor. Without proper care, even minor injuries can worsen within 24 to 48 hours.
Can I put Neosporin on my chicken's wound?
Plain triple-antibiotic ointment without pain relievers is generally safe for topical use on chickens. Avoid formulas containing lidocaine or other numbing agents, which can be toxic to birds. Apply a thin layer after cleaning the wound, then cover with a gauze pad and vet wrap. A chicken first aid kit that includes triple-antibiotic ointment packets simplifies this step and keeps dosing consistent.
When should you consult a veterinarian for a chicken injury?
Call a vet if bleeding won't stop after five minutes of pressure, if the wound exposes bone or internal tissue, if the bird stops eating or drinking, or if you see signs of infection in chickens like green discharge, swelling, or lethargy lasting more than a day. Deep puncture wounds and degloving injuries also need professional care. Early veterinary intervention improves outcomes and reduces suffering.