

How to Build Modular Kits: A Step-by-Step Guide
Table of Contents
- Step 1: Plan Your Modular Kit Before You Buy Anything
- Step 2: Create a Custom First Aid Kit Checklist
- Step 3: Build the Core Module (Bleeding Control and Trauma)
- Step 4: Add Specialty Modules for Your Specific Needs
- Step 5: Organize, Label, and Stress Test Your Kit
- Medical Kit Refill Strategies That Keep You Ready
- How to Build Custom First Aid Kit Systems for Groups and Crews
- Frequently Asked Questions
Last Updated: September 10, 2026
Step 1: Plan Your Modular Kit Before You Buy Anything
Most first aid kits fail before a single item is purchased. They get assembled without a defined purpose, which means they end up overstuffed with supplies nobody knows how to use and missing the ones that matter.
Building modular kits starts with a clear mission: what environment the kit lives in, who will use it, and what injuries or illnesses it needs to handle. A kit that stays in a car faces different demands than one carried into the backcountry.
This guide from RestockYourKit.com walks through planning, assembling, and maintaining modular kits built around your actual needs, not a generic supply list.
Define the Mission and Environment
Write down where the kit will live and what it needs to handle. A home kit covers burns, cuts, and fevers. A vehicle kit adds bleeding control and roadside trauma supplies. A wilderness kit needs supplies for hours of delayed rescue.

The environment decides your container, your module count, and how much weight you can reasonably carry.
Set a Budget and Choose Your Container
Pick a container that matches the mission, not the other way around. Soft pouches work for cars and packs. Hard cases suit home storage and group kits where contents stay stationary.
A common mistake is buying the bag first and then filling it with whatever fits. That approach produces a kit with no logic behind it.
Step 2: Create a Custom First Aid Kit Checklist
A custom first aid kit checklist is a written inventory organized by module, listing every item, its quantity, and its expiration date. The checklist turns a pile of supplies into a system you can audit in minutes.
Build the checklist before you buy anything. It forces you to justify each item and prevents duplicate purchases.
Organize it by module, not alphabetically. Bleeding control, wound care, medications, and specialty items each get their own section. When something gets used, you check the list and know exactly what to replace.
| Module | Core Contents | Refill Cadence |
|---|---|---|
| Bleeding control | Tourniquet, gauze, chest seal | After any use |
| Wound care | Irrigation, closure strips, dressings | Every 6-12 months |
| Medications | Aspirin, antacid, antihistamine | Check expiry yearly |
| Specialty | Mission-specific supplies | Varies by item |
Keep a digital copy and a printed copy inside the kit. The printed version matters when phones are dead.
Step 3: Build the Core Module (Bleeding Control and Trauma)
The core module handles severe bleeding and traumatic injury, and it should be the first module you build. Severe hemorrhage can become life-threatening within minutes, well before emergency services arrive (stopthebleed.org).
RestockYourKit.com's Bleeding Control Kit - Customizable gives you a starting point you can adjust to your mission. It covers the essentials for controlling major bleeding in the field.
For restocking a kit you already own, the Trauma Kit (REFILL KIT) includes nitrile gloves, an Israeli trauma bandage, and a vented chest seal, with or without a C-A-T tourniquet.

Keep this module in its own pouch. When someone is bleeding, you should not be digging through bandages and antacid packets to find gauze.
Step 4: Add Specialty Modules for Your Specific Needs
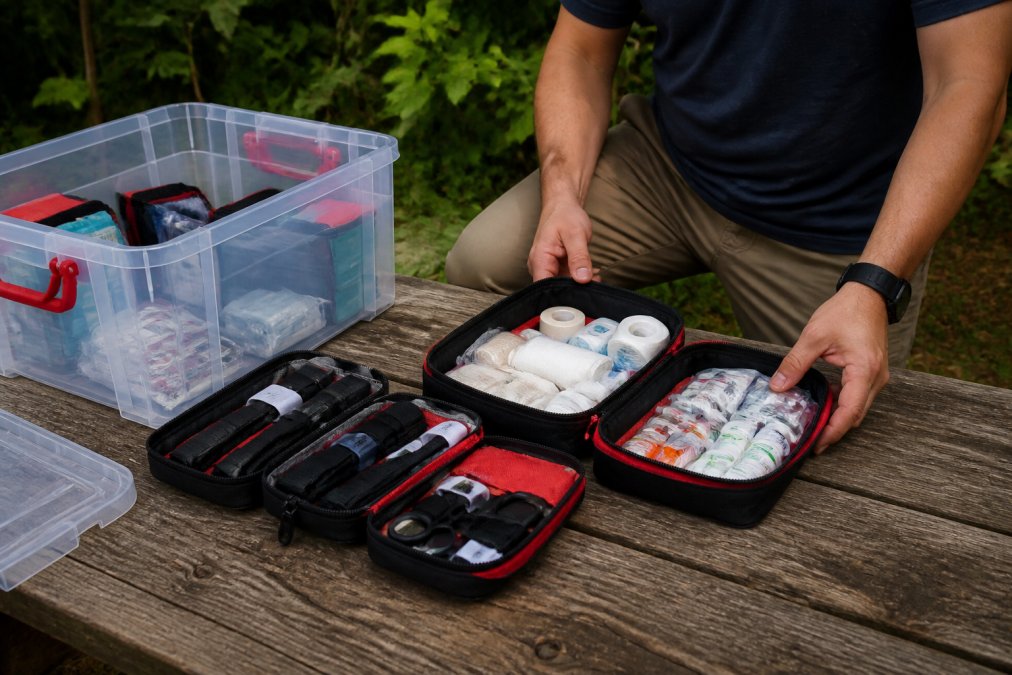
Specialty modules are what separate a generic kit from one built for your life. Two examples show how far the customization can go.
Backyard Poultry and Animal Care Module
Small flocks need supplies most human kits never include. Wound care for pecking injuries, supplies for treating parasites, and basic medications for common flock illnesses all belong in a dedicated animal module.
Keep it separate from your human kit. Cross-contamination and confusion are real risks when supplies get mixed.
Wilderness and Remote Module
Remote kits assume delayed rescue. That means more wound care supplies, more medications, and tools for prolonged care rather than quick handoff.
Step 5: Organize, Label, and Stress Test Your Kit
Organization is what makes a modular kit usable under pressure. Label every pouch by module name, not contents. "Bleeding Control" beats "Gauze and Stuff." The label should tell a stranger what the pouch does, not what is inside it, because the person reaching for it may not be you.
Build a Naming Convention Before You Build the Kit
Technical debt starts the moment you improvise labels. A standardized naming schema keeps modules findable across kits, vehicles, and crew members. A workable pattern is [KIT]-[MODULE]-[VERSION], so a bleeding control module for a vehicle kit reads VEH-BLEED-v2. Apply the same schema to your written checklist, your digital inventory, and the physical label. When the three match, anyone can audit the kit without asking you a question.
Keep one master file, a spreadsheet or a shared document, that lists every module, every item, quantity, and expiration date. Store it where the whole household or crew can reach it. Version the file the same way you version the modules, so a change to the bleeding pouch is reflected in the inventory the same day.
Run Three Stress Tests, Not One
A single timing drill is not enough. Run these three in order, and repeat them after any major change to the kit.
- The blind retrieval test. Hand the kit to someone who has never opened it. Call out a scenario, "partner is bleeding from the thigh", and time how long it takes them to get the right pouch open and the right item in hand. Under 30 seconds is the target (stopthebleed.org). Over 60 seconds means the label or the pouch placement is wrong, not the person.
- The one-handed test. Many real injuries happen to the person using the kit, or in the dark, or in rain. Open each module with one hand and in low light. Zippers that snag, pouches that require two hands to peel open, and items packed so tightly they need a table to lay out are all failures. Repack until each module opens cleanly with one hand.
- The drop-and-shake test. Close the kit, drop it from waist height onto a hard floor, and shake it. Then open it and check for two things: items that migrated between modules, and items that escaped their pouch. Migration is the most common modular failure, a loose tourniquet that slides into the wound-care pouch is a tourniquet you will not find when you need it.
Troubleshoot the Common Failures
Most modular kit problems fall into a small set of repeatable failures. Fix them at the source rather than working around them.
- Cross-module migration. Items move because pouches are underfilled or unsealed. Add a small stuff sack or elastic loop inside each pouch, or move to a pouch with a full-length zipper. Never rely on the outer bag to keep modules separate.
- Label failure. Marker on fabric fades, tape peels, and laminated tags crack. Use a printed label sealed under clear tape, or a stitched tag, and re-check labels at every inventory. A faded label is a missing label.
- Seam and zipper blowout. Pouches fail at the seam before the fabric does. Check seams and zipper pulls at every six-month inventory, and retire any pouch that has started to fray. A pouch that fails during a real event takes its contents out of the kit with it.
- Misalignment between checklist and kit. The checklist says one thing, the pouch holds another. This happens when refills are dropped in without updating the master file. Make updating the file the first step of every refill, not the last.
Run a full inventory check every six months and after every use (redcross.org). Log the date of the check on the master file so the next person knows when it was last verified.
Medical Kit Refill Strategies That Keep You Ready
Refill strategy matters more than initial assembly. A kit is only as good as its current contents, and the gap between a well-built kit and a reliable one is almost entirely a refill and inventory discipline problem. personalized gift boxes.
Set Par Levels, Not Just Lists
A checklist tells you what belongs in the kit. A par level tells you how many of each item must be present for the kit to be considered ready. They are not the same thing, and the difference is what keeps a kit functional after a partial use.
For each module, write down a minimum and a target quantity. The minimum is the floor, below it, the module is out of service. The target is what you restock to. For example, a bleeding control module might have a minimum of one tourniquet and a target of two, so a single use does not take the module offline. A wound care module might have a minimum of four closure strips and a target of eight. Set these numbers once, then audit against them instead of against a flat list.
Build a Refill Cadence Around Expiration Windows
Expiration dates drive the refill calendar. Work backward from the earliest expiration in each module and set a reminder 60 days out. That window gives you time to order, receive, and restock without the module ever sitting below its minimum.
A practical cadence looks like this:
- After every use. Replace anything consumed, and update the master file the same day. Do not defer this, deferred refills are the single largest cause of a kit quietly going out of service.
- Every six months. Full inventory against par levels. Check expiration dates, seals, and pouch condition. Replace anything within 60 days of expiring.
- Annually. Review the mission itself. If the kit's role has changed, a home kit that now travels, a vehicle kit that now supports a crew, the modules and par levels need to change with it.
Consolidate Refills to Reduce Cost and Waste
Buying individual items as they run out is convenient but expensive. Buying in slightly larger quantities and consolidating into fewer orders lowers the per-item cost and cuts shipping. A common pattern is to keep a small "refill bin" at home or in the shop, stocked with the items your kits burn through fastest, gauze, closure strips, gloves, common medications, and pull from it when a module drops below its minimum. Reorder the bin when it hits its own par level, not when a specific kit runs out.
This also solves the duplicate-purchase problem. When every kit draws from the same refill bin, you stop buying the same item three times because three kits each ran low at different moments.
Scale Refills Across Multiple Kits
One kit is a checklist. Five kits are a system, and systems need a single point of control. Keep one master inventory that covers every kit, with columns for kit ID, module, item, par level, current quantity, and expiration date. When you refill, update the master file first and the physical kit second. That order prevents the most common failure in multi-kit setups: a refill that gets dropped into the wrong kit and never recorded.
If multiple people use the kits, name one person as the refill owner. That person runs the audit, places the order, and updates the file. Without a named owner, refills drift and kits decay at different rates, which defeats the purpose of standardizing modules in the first place.
RestockYourKit.com offers individual quantities of medical supplies at near-wholesale prices, so you can replace exactly what you used instead of buying a whole new kit. The Super Basics Refill Kit covers the everyday medications most kits burn through, and the Wound Closure Refill Kit handles irrigation and closure supplies.

Free shipping applies on orders of $79 or more, which makes consolidating refills into one order worthwhile, especially when you are restocking several kits at once.
How to Build Custom First Aid Kit Systems for Groups and Crews
Group kits change the math. Instead of one comprehensive kit, build several modules that can travel independently or combine into a larger system.
Assign one person as the kit owner. That person runs the inventory checks, tracks expirations, and handles refills. Without a named owner, group kits decay fast.
For crews, standardize your modules. If every vehicle carries the same bleeding control pouch in the same location, anyone can find supplies in any rig. That consistency is the whole point of modular design.
Naming conventions and file organization matter here too. Label modules by function and version, and keep your master checklist in one shared location so every crew member works from the same inventory.
Frequently Asked Questions
How much does a modular first aid kit system cost?
Costs vary by module. At RestockYourKit.com, a customizable Bleeding Control Kit starts at $125.00, a Trauma Kit Refill Kit is $27.99, a Wound Closure Refill Kit is $6.99, and The Super Basics Refill Kit is $5.99. Building modularly lets you start with a core kit and add specialty modules as your needs grow, spreading the cost over time.
How do you organize a modular medical kit?
Group supplies by function into separate pouches or compartments: bleeding control, wound care, medications, and specialty items. Label each module clearly. Use a custom first aid kit checklist to verify contents before and after each use. Keep the most critical module, bleeding control, accessible without unpacking the entire kit.
What are the disadvantages of modular kits?
Modular kits can cost more upfront than a single pre-assembled kit because you buy components separately. They also require discipline to maintain: if you do not restock modules after use, you may discover gaps during an emergency. Set a regular refill schedule and use a checklist to prevent that problem.
How often should I refill or update my modular kit?
Check your kit every three to six months for expired medications, damaged packaging, and depleted supplies. Replace used items immediately with refill kits like The Super Basics or Wound Closure Refill Kit. Mark expiration dates on each module so you can spot what needs rotating without emptying the whole kit.
Building modular kits is a discipline, not a one-time purchase. Kits drift out of date, supplies expire, and modules get raided without replacement. RestockYourKit.com makes the maintenance side manageable with custom-built kits, individual refill quantities at near-wholesale prices, specialized poultry and animal care supplies, and free shipping on orders of $79 or more. Get started with RestockYourKit.com and build a kit that stays ready every time you open it.