

How to Build a Compact Trauma Kit: IFAK Guide 2026
Table of Contents
- Start with Bleeding Control: The Core of Any Compact Trauma Kit
- Your 2026 IFAK Checklist: Must-Have Items for a Compact Kit
- Best Tourniquets for Civilian Use: What to Carry and Why
- Airway and Breathing: Essential Gear for a Complete Kit
- Compact Trauma Kit Organization Tips: Pack Smart, Save Space
- Choosing the Right Bag or Pouch for Your Compact Trauma Kit
- Weight, Volume, and Durability: Optimizing Your Kit for Real-World Use
- Frequently Asked Questions
Last Updated: September 22, 2026
Start with Bleeding Control: The Core of Any Compact Trauma Kit
Bleeding control is the first priority in any trauma kit because blood loss is the most immediate threat to life. A compact trauma kit is a small, portable medical bag built to stop severe bleeding and support breathing in an emergency. At RestockYourKit.com, we help people pack the right gear without wasting space.
The order of care follows a simple rule: stop the bleed, then open the airway, then keep the body warm.
That order matters more than any single item you buy.
The American College of Surgeons Stop the Bleed program teaches that uncontrolled bleeding is a leading cause of preventable death after injury. That is why every item in your kit should serve bleeding control first.
Here is the priority list:
- Tourniquet for limb bleeding
- Hemostatic gauze for wound packing
- Pressure dressing for steady compression
- Chest seal for torso wounds
Everything else supports these four jobs.
Your 2026 IFAK Checklist: Must-Have Items for a Compact Kit
An IFAK checklist for 2026 should cover bleeding, breathing, and basic wound care in one small pouch. The goal is a kit you can grab and carry without thinking.
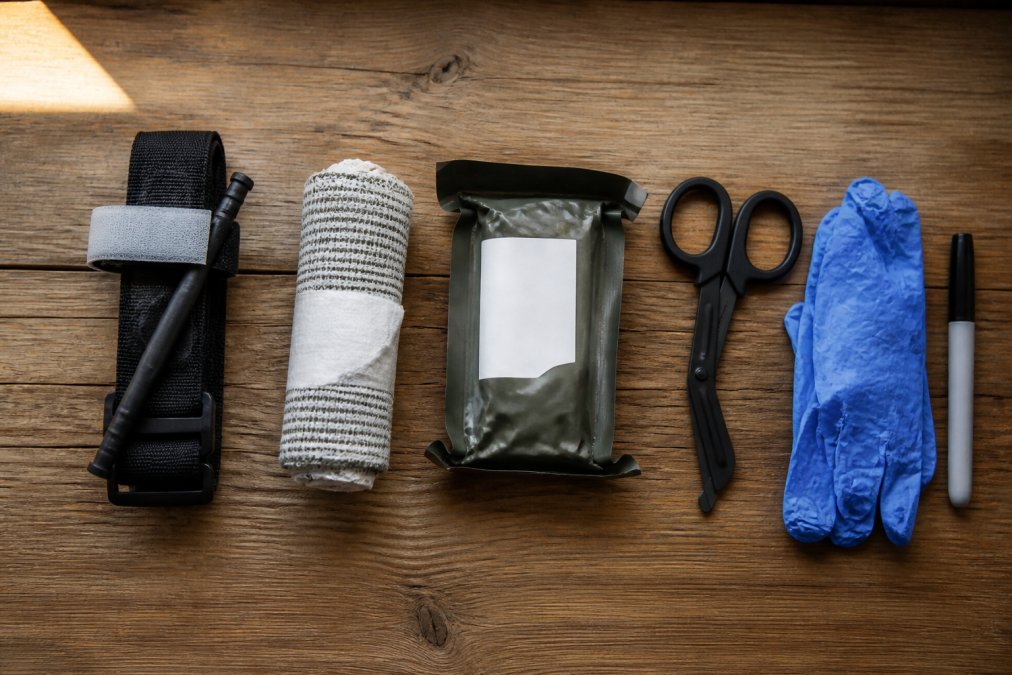
The mistake most gear lists make is treating every user the same. A kit built for someone who has never taken a Stop the Bleed class should not look like a kit built for a paramedic. Match the gear to the training you actually have, because a tool you cannot use is just weight.
Tier 1, No formal training (the baseline kit)
This tier assumes you have watched a video or read a guide but have not practiced on a manikin. Every item here is designed to be used with one hand under stress:
- One windlass tourniquet, staged and ready
- One hemostatic gauze roll (kaolin- or chitosan-impregnated)
- One pressure dressing
- Two vented chest seals
- Trauma shears
- Two pairs of nitrile gloves
- A permanent marker for writing the tourniquet application time
- A compact hypothermia blanket
Tier 2, Stop the Bleed or equivalent certification
Add these once you have practiced wound packing and airway basics on a manikin:
- A second tourniquet (one on your person, one in the kit)
- A nasopharyngeal airway with water-based lubricant
- A CPR face shield or pocket mask
Tier 3, Advanced (EMT, WFR, or military-trained)
Only add these if you have current, hands-on training:
- A supraglottic airway or King LT
- A 14g or 10g chest decompression needle
- A small suture or wound-closure kit
If you cannot explain when not to use an item, leave it out.
Expiration and maintenance
Gear expires, and expired gear fails. Build a rotation habit:
- Hemostatic gauze: check the manufacturer date, most kaolin and chitosan gauze carries a 3- to 5-year shelf life
- Chest seals: replace every 3 to 5 years, or sooner if the adhesive has dried
- Tourniquets: no formal expiration, but inspect the windlass, clip, and band for cracks or UV damage twice a year
- Nitrile gloves: replace annually; they degrade in heat
- Hypothermia blanket: replace if the foil coating flakes
Write the expiration date of each item on a strip of tape on the outside of the pouch. When you rotate one item, rotate them all.
The [American Red Cross first aid(/products/soft-clamshell-first-aid-kit-case) guidance | redcross.org] stresses that training and gear work together. A tool you cannot use is just weight, and a tool that expired two years ago is worse than no tool at all.
Best Tourniquets for Civilian Use: What to Carry and Why
The best tourniquet for civilian use is a CoTCCC-recommended windlass design, because it works one-handed and stops limb bleeding fast. The Committee on Tactical Combat Casualty Care guidelines maintains the recommended list that most agencies follow.
Look for these traits:
- A metal windlass that will not snap
- A wide band that spreads pressure
- A secure clip or buckle
- A space to write the application time
A common mistake is buying a cheap copy. In practice, off-brand tourniquets fail when it counts.
Carry one tourniquet on your person and one in your kit. Two is the standard for most responders.
Airway and Breathing: Essential Gear for a Complete Kit
Airway and breathing gear keeps a blocked or injured airway open and supports breathing. For a compact kit, keep this part small and focused.
Your airway items:
- A nasopharyngeal airway with lubricant
- A CPR face shield
- A vented chest seal for open chest wounds
Airway management is the practice of keeping the passage from the mouth to the lungs clear and open. In a compact kit, that usually means a basic airway tube and a barrier for rescue breaths.
Wound packing and airway care often overlap. A chest seal is an occlusive dressing that stops air from entering a chest wound.
Only pack airway tools you have trained on. Skill-to-gear matching keeps your kit honest.
Compact Trauma Kit Organization Tips: Pack Smart, Save Space
Compact trauma kit organization tips start with one rule: group items by job, not by type. That means all bleeding gear goes in one spot.
Use this layout:
- Front pouch: tourniquet and shears
- Main pocket: gauze, pressure dressing, chest seals
- Side pocket: gloves, marker, blanket
Label each section with a strip of tape. In an emergency, you will not want to search.
Roll gauze tight and flatten packaging. Remove bulky boxes and keep only the sterile inner wrap.
Choosing the Right Bag or Pouch for Your Compact Trauma Kit
Choosing the right bag comes down to where the kit will live. A car kit needs different features than an EDC pouch.
| Use Case | Best Bag Type | Key Trait |
|---|---|---|
| Vehicle | Clamshell case | Opens flat, easy to reach |
| EDC / pocket | Small pouch | Low profile, light |
| Boat / water | Dry bag | Waterproof seal |
| Crew / team | Go-bag | Multiple compartments |
For a personal kit, the Soft Clamshell First Aid Kit Case fits the bill. It has a clear divider and small pockets for shears and gloves, and it weighs just 6 ounces.

For crews, the First Responder Go-Bag holds a larger BLS kit with outside pockets for fast access.

Weight, Volume, and Durability: Optimizing Your Kit for Real-World Use
Weight, volume, and durability decide whether you actually carry your kit. A kit left at home saves no one. This is the section most guides skip, they hand you a gear list and never tell you whether the finished kit will survive a hot trunk, a wet backpack, or a 12-hour shift on your belt.
Weight targets that hold up in practice
- A pocket or EDC kit: 6 to 10 ounces
- A personal belt or bag kit: 1 to 2 pounds
- A vehicle kit: 2 to 4 pounds
- A team or go-bag kit: 5 to 10 pounds
Volume tricks that actually work
- Remove outer cardboard and keep only the sterile inner wrap
- Vacuum-seal soft items like the hypothermia blanket, it cuts bulk by roughly half and keeps them dry
- Roll gauze tight instead of folding it flat
- Choose a tourniquet pouch that holds the device staged flat, not folded into a square
- Skip the hard plastic case unless the kit lives somewhere it will be crushed
Environmental durability, the angle most guides miss
A simple durability test
Frequently Asked Questions
What are the essential items for a compact trauma kit?
A compact trauma kit should include a tourniquet, hemostatic gauze, a chest seal, a pressure dressing, trauma shears, nitrile gloves, and a permanent marker. These items address life-threatening bleeding and airway issues. For a full list, see our IFAK checklist 2026. Keep your kit small by choosing compact versions of each item, like a soft clamshell case or a 2L dry bag.
How do you pack a trauma kit for everyday carry?
For everyday carry, use a compact pouch or bag that fits your daily routine. Organize items by priority: bleeding control first, then airway, then other supplies. Use internal pockets or elastic loops to keep items secure and accessible. A soft clamshell case or a small dry bag works well. Remember to include only what you need and can use, and practice accessing items quickly.
What is the difference between a first aid kit and a trauma kit?
A first aid kit handles minor injuries like cuts, scrapes, and burns, with bandages, antiseptics, and medications. A trauma kit focuses on life-threatening emergencies, such as severe bleeding, airway obstruction, and chest wounds. It includes items like tourniquets, hemostatic gauze, and chest seals. While both are important, a compact trauma kit is designed for immediate, critical intervention.
How often should you replace items in your trauma kit?
Check expiration dates on medications, gauze, and other sterile items every six months. Replace anything expired or damaged. Tourniquets and tools generally don't expire but inspect them for wear. Set a reminder to review your kit annually or after any use. RestockYourKit.com offers refill options to keep your kit current without buying a whole new kit.
Building a compact trauma kit takes an afternoon, but keeping it ready takes a system. RestockYourKit.com makes that easy with custom-built kits, individual supplies at near-wholesale prices, and flexible refill options so nothing expires on your watch. Our expert-curated modules cover bleeding control, airway gear, and hard-to-find items, with free shipping on orders of $79 or more. Get started with RestockYourKit.com and build a kit you can trust when it matters most.